Posts

Showing posts with the label OCS Office Communications Server R2 Server step by step install guide walkthrough

Set up user settings on OCS

Image
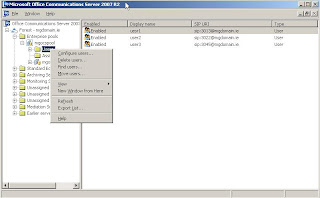
Set up user settings on OCS Under the pool name , right click on the users folder (to do all users or on each one for individual settings) and configure users: For Voice we hit next four (4) times, then on the following screen: Enable enterprise voice as above and click Next . Next for each individual user we need to configure the following details, simply right click on the user and configure user (This can be done in AD or through scripting either) The Sign-in name should be SIP: followed by SAMaccount name. Also hit Configure (Telephony Settings:) and set up as follows – Line URI will be tel: then the full phone number with +xxx Server URI will be simply sip: Location profile we can select from the list which we created in a previous step. Now restart all services including mediation server and front end services and log in to the clients: In this setup we log in using:- 3013@mgdomain.ie User: mgdomain\user1 Password: Passw0rd

Section 2: Add Enterprise Edition Server to Pool - Step 6.6: Validate Application Functionality

Image
Section 2:    Add Enterprise Edition Server to Pool Step 6.6: Validate Application Functionality We have none of these set up so will not be validating them at this time.

Section 2: Add Enterprise Edition Server to Pool - Step 6.5: Validate Application Sharing Server Functionality

Image
Section 2:    Add Enterprise Edition Server to Pool Step 6.5: Validate Application Sharing Server Functionality Click Next to splash screen, choose steps to validate and click Next, When done review logs and click Finish. These errors are OK as CWA server not set up yet.

Section 2: Add Enterprise Edition Server to Pool - Step 6.4: Validate Audio/Video Conferencing Server Functionality.

Image
Section 2:    Add Enterprise Edition Server to Pool Step 6.4: Validate Audio/Video Conferencing Server Functionality. Click Next to splash screen, choose steps to validate and click Next, When done review logs and click Finish. These errors are also ok as we don’t have phone system linked yet.

Section 2: Add Enterprise Edition Server to Pool - Step 6.3: Validate Web Server Conferencing Functionality

Image
Section 2:    Add Enterprise Edition Server to Pool Step 6.3: Validate Web Server Conferencing Functionality Click Next to splash screen, choose steps to validate and click Next, When done review logs and click Finish.

Section 2: Add Enterprise Edition Server to Pool - Step 6.2: Validate Web Components Server Functionality

Image
Section 2:    Add Enterprise Edition Server to Pool Step 6.2: Validate Web Components Server Functionality Click Next to splash screen, choose steps to validate and click Next, When done review logs and click Finish .

Section 2: Add Enterprise Edition Server to Pool - Step 6.1: Validate Front End Server Configuration

Image
Section 2:   Add Enterprise Edition Server to Pool Step 6.1: Validate Front End Server Configuration First validation is for Front End Server Configuration. We will need two accounts for most of these checks. Click Run. Click Next to splash screen, select steps to validate and click Next . Fill in details for first user to use for checks and click Next. Fill in details for second user to use for checks and click Next. Now we can check connectivity to federated users, we dont have this set up yet so do not tick the box and choose Next . When done review logs and click Finish . These errors are ok as we don’t have phone system linked yet.

Section 2: Add Enterprise Edition Server to Pool - Step 6: Validate Server and Pool Functionality

Image
Section 2:    Add Enterprise Edition Server to Pool Step 6: Validate Server and Pool Functionalit y Before we start this we need to enable some test users for OCS in AD. We can do this through the Communications snap in which was installed as part of the support pack we installed earlier on the Front End server, which will attach to the Windows Support tools we install now from the Windows 2003 website http://www.microsoft.com/downloads/details.aspx?familyid=e487f885-f0c7-436a-a392-25793a25bad7&displaylang=en (Note: Ensure 32 or 64 bit download as required (adminpak.MSI). NOTE: I rebooted after installing this admin pak. Lets Install the Admin Tools on the FE server and Domain Controller: On the right hand pane of the screen click on Administrator Tools      Agree to the License, click   Next , when completed note a green Tick beside the menu item. Also note : (Sometimes) Running in 64bit mode will require you to run dsa.msc -32 so the communicator s...

Section 2: Add Enterprise Edition Server to Pool - Step 5: Start Services

Image
Section 2:  Add Enterprise Edition Server to Pool Step 5: Start Services To start the services click on Run . Click Next on splash screen, review services it will restart and click Next. When completed review log and click F inish. We had a failure as some servers, i.e. telephony server has not been installed yet.

Section 2: Add Enterprise Edition Server to Pool - Step 3: Configure Web Components Server Certificate

Image
Section 2:  Add Enterprise Edition Server to Pool Step 3: Configure Web Components Server Certificate We now assign the cert to the web server manually. We do this through IIS Administrator . Under Default Website > Properties > Directory Security : Now click on Server Certificate . Now ASSIGN certificate, which we created earlier. Click on Next on splash screen then click on Assign an existing certificate and click Next. Now choose the cert we created.(Should be the only one here in most cases) Click Next and then confirm SSL port is using default 443 and click Next . Review selections and click Next, when finished click Finish to complete.